Product Details:
Payment & Shipping Terms:
|
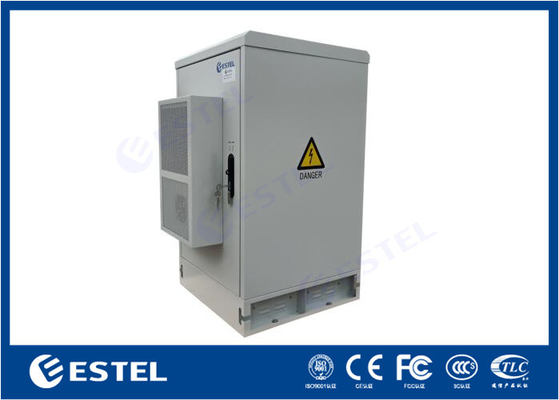
Size: | H1150mm×W650mm×D650mm | Space: | 20U 19" Rack |
---|---|---|---|
Material: | Sanwich Structure Panel, Galvanized Steel, | Finish: | Anti-corrosion Powder Coating |
IP Grade: | IP55 | Cooling System: | AC 500W 220VAC 50Hz Air Conditioner |
Insulation: | PEF | Protection Level: | IP55 |
Color: | RAL7035 | ||
Highlight: | 20U Outdoor Electrical Cabinet,Thermostatic Sandwich Outdoor Electrical Cabinet,Emerson Power System Outdoor Telecom Cabinet |
20U 19" Thermostatic Sandwich Outdoor Electrical Cabinet Emerson Power System Monitoring Unit
20U 19" Thermostatic Sandwich Outdoor Telecom Cabinet With Emerson Power System, Monitoring Unit
Technical Parameters:
Configuration | Configuration | Technical Parameter | |
Cabinet | Model | ET6565115-EQ | |
Protection Level | IP55 | ||
External Dimension | H1150mm×W650mm×D650mm | ||
Internal Dimension | 19inch 20U | ||
Material |
Galvanized steel, 1.2mm thickness, single wall. Thickness of bearing parts: 2.0mm |
||
Insulation | PEF | ||
Coating | Polyester powder coating | ||
Color | RAL7035 | ||
Lock | Anti-theft three-point locking system | ||
Hinge | Inner hinge | ||
Installation Options | Floor mounted | ||
Cable Routing | Cable in and out from the bottom of cabinet | ||
Maintenance | One front door,front maintenance. | ||
Cooling | DC Air conditioner | 500W 220VAC 50Hz | |
Others | 220VAC 50Hz LED lamp | ||
The entrance guard switch | |||
Environment | Working Temperature | -40℃~+55℃ (+Solar Radiation) | |
Storage Temperature | -40℃~+70℃ | ||
Working Humidity | 5%~95%(No condensation) | ||
Working Altitude | 0~4000 meters |
Sanwich structure panel, galvanized steel, double wall with heat insulation
Cabinet installation
Unpacking
Outdoor integrated cabinets are generally packed in wooden cases. When disassembling the package, take care to avoid damage to the cabinet.
Cabinet base
The size of the base of the cabinet and the fixing hole of the base expansion bolt are shown in Figure .
2.3 Cabinet fixing
( 1 ) According to the hole position map or the scribe template of the cabinet base, the base expansion bolt hole of the cabinet is punched with a hammer drill in advance, and the diameter of the hole is referenced to the size of the expansion bolt;
( 2 ) First, fix the leftmost or rightmost first cabinet with expansion bolts, place the remaining cabinets one by one, and finally fix the cabinets with the expansion bolts.
( 3 ) If you need to seal the base of the cabinet, use the base sealing plate (optional) to seal the notch and hole around the base. The mounting screws are the M5 stainless steel screws in the cabinet attachment (see Figure 5 ).
Note: If the cement foundation is not flat, it is recommended to use a gasket or spacer to level the base of the cabinet.
Figure 5
Note: When crossing the wire loop, first cut the cross with a utility knife. After the cable is connected, seal the remaining gap on the wire loop with the sealing glue attached to the cabinet.,As shown below;
image:
Diagram:
Contact Person: Fiona Liang
Tel: +8613752765943 / 86-0755 23592644